Home Recording Guide For Rock And Metal –
Part 3: Home Studio Setup

Setting up a home studio to self-record your band’s music can be daunting. There’s so much gear to choose and so much room to mess things up. In the third part of the Home Recording Guide we’ll discuss the different aspects of setting up a home recording studio for your band.
1. Room preparation
1.1 Moving objects, furniture etc.
- See if you can rearrange desks/tables, shelves, couches etc. to accommodate the studio gear in the best way possible.
- You might need to remove some objects from the room to make room for that.
- Try to use movable objects to your advantage by covering large blank walls to diffuse (“scatter”) the sound reflections there.
- Think about where you’re going to place sound absorption material / panels to absorb room “echo” / reverberation. Keep in mind that you’ll need absorption panels with around 4” of thickness.
1.2 Acoustic treatment
As you will probably use the same room both as the “live room” and the “control room”, you’ll need acoustic treatment for those two applications. For recording purposes in small rooms (or not professionally built studio rooms), I recommend you make the room as “dry” as possible. This is simply because the room most likely doesn’t really have a desirable sound of its own, so it’s best to “remove” as much of it as possible. These are the basic points to cover:
- Get rid of “flutter echoes” (i.e. the audible back-and-forth “bounce” between walls) by absorbing or diffusing sound on directly opposing reflective areas (walls, ceiling/floor). You can do this by placing absorption panels, or other absorption materials, or objects that diffuse the sound (e.g. cupboards/shelves) at the relevant areas.
- Get rid of reflections right next to the artist/instrument being recorded. Put absorption material at the points on the nearest walls where you would get a direct reflection from the source back to the mic.
- Build a “vocal booth” corner by covering it in thick absorption material / panels, put the mic in the corner facing the absorbers and pointing away from the rest of the room. You can also read about this in my room acoustics tips for vocal recording.
- Prepare the space for the computer, interface, studio monitors etc. (“control room”) by choosing a suitable side of the room. This means that you should be able to set up the studio monitors symmetrically so that the listening position is the same distance from both side walls.
- As before, make sure there are no flutter echoes and no audible reverb from the room at this position.
- Now you need to absorb sound at the first reflection points, i.e. points on the walls, where the sound from the speakers is directly reflected to the listening position. They are the points at which you would see the speakers in a mirror parallel to the wall from the listening position.
- To round off the treatment, cover all corners of the room with full-height bass traps that are as thick/wide as you can fit.

2. Recording space setup
This part is about the “live room” part of your home studio. This is where you set everything up that is going to be recorded: Instruments, microphones, etc. These are some tips on what you can do here:
- Find the optimal spot to place instruments, with the right distance to walls.
- If necessary, try different instrument positions while walking through the room and listening for the most balanced overall sound. This is mainly relevant for acoustic instruments such as a drum kit or acoustic guitars.
- Think about where you’re going to run cables, especially when recording acoustic drums.
- Don’t just set the musical gear on the blank floor. Try to decouple drums, guitar cabinets and combos from the floor a bit by setting them on a carpet. With guitar cabinets, you can even use a flight case or case cover, put it on the floor, put a blanket on over it and place the cabinet on top.

3. "Control room" space
Once you prepared the room you can set up the studio monitors, desk, audio interface and computer in the optimal area of the room. There are a few things to keep in mind to avoid sacrificing the sound quality of your setup:
- “Stereo triangle”: The general rule of thumb for the setup of stereo studio monitors is to build an equilateral triangle between the two speakers and the listening position. In other words, the distance from each speaker to the head is the same as the distance between the two speakers. This listening position is commonly called the “sweet spot”.
- Listening distance: This is how far away the speakers are from your ears when listening in the sweet spot. With typical near-field monitors for home studio setups this distance should be around 1m to 1.5m (3 to 5 ft).
- Distance to the wall(s): Without going into the specific reasons and the math behind it, here’s a rule of thumb for the distance between a speaker and a wall: Avoid distances between 8m and 2m (2.5 ft and 6.5 ft). Regarding the wall behind the speakers: It’s generally best in most home recording scenarios to place the speakers as close to the back wall as possible. The resulting bass build-up is relatively easy to compensate for using the room control switches/knobs that most studio monitors have built in.
- Speaker height: The tweeter, or more specifically the acoustical center of the speaker (usually somewhere between the tweeter and the low-mid driver) should be at ear level.
- Speaker angle: For the best results in the sweet spot, the speakers should be angled directly towards the ears when sitting at the listening position.
- Speaker mounting: There are floor stands and desk-mountable stands available at every major music store that allow you to properly set up your speakers. Avoid setting them directly on the desk and use some isolation material underneath the speakers if possible (foam or more specific products for decoupling studio monitors).
In addition to the speakers, you now need to place/mount all other studio devices on or around the desk – which would usually be the audio interface, computer and optionally an additional mic preamp, MIDI keyboard etc.
Arrange those devices in the most ergonomic way possible while avoiding acoustical interference with the speakers. One tip is to place the computer screen on top of the audio interface – this way you save a bit of desk space while having the interface comfortably in front of you.

4. Cable management
After all studio equipment is set up, you need to connect some cables. Let’s go through all typical permanent connections one-by-one:
- Power: computer, audio interface, studio monitors
- Studio monitors: audio from interface monitor outputs
- Audio interface via USB or Thunderbolt to the computer
- Optionally: External preamp to the interface (typically via ADAT)
Everything else will depend on what you’re recording in the moment and might not be connected permanently:
- Microphones
- Instruments (guitar/bass)
- DI boxes
When you connect all the above one by one, you should pay attention to where you lay the cables. It’s a good idea to choose cable paths that are as unobtrusive as possible. You can tie cables together and/or secure them to the desk and wherever else appropriate. This is highly dependent on your room and setup though, so there are no general rules here.

5. Interface/preamp configuration
Now that you have everything physically set up in a way that works for you, you need to configure your devices to get the signals from the instruments all the way to the channels/tracks they’re going to recorded on.
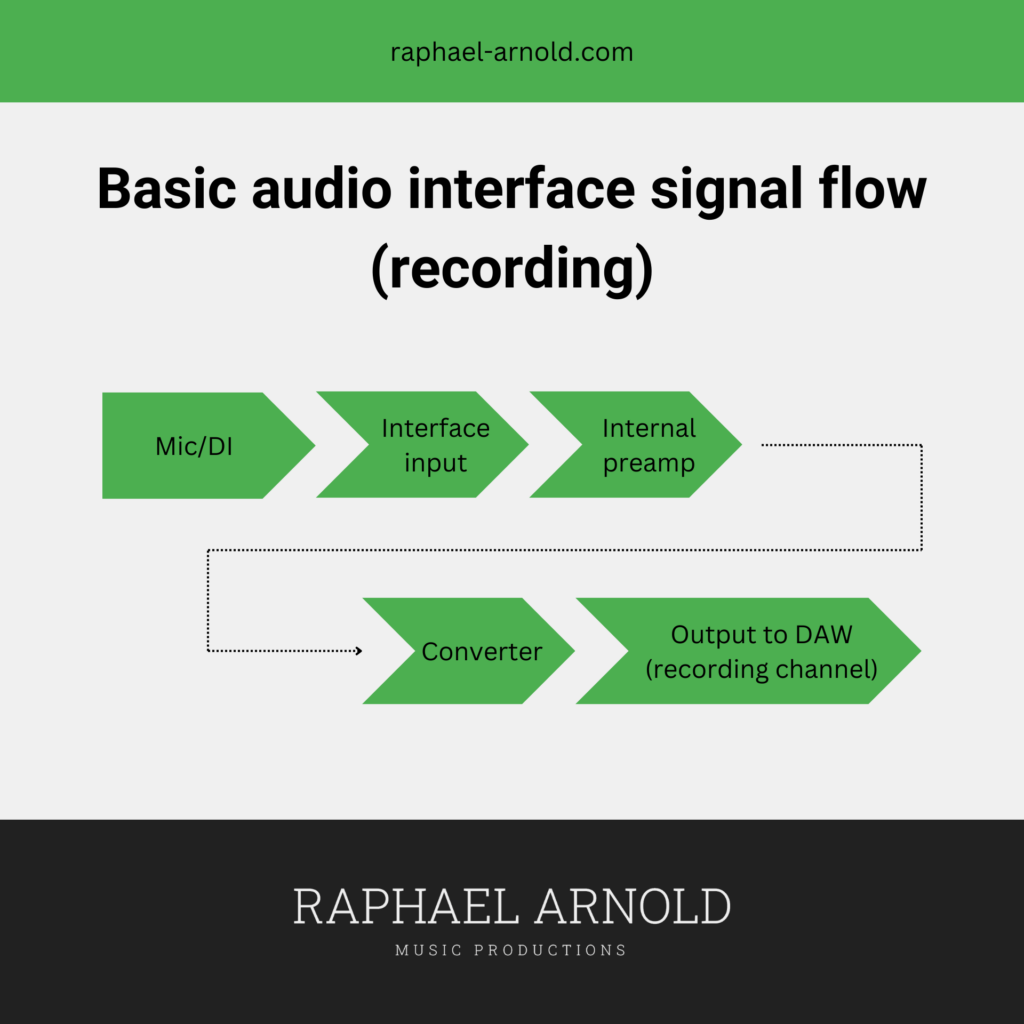
Before we get into the specifics of how to configure your device(s), let’s look at the signal flow first. Signal flow is just the path from a signal’s origin (source) to its destination(s) with all the points it crosses in between. The specific path of a signal as well as the act of setting it up is called routing.
If we look at a typical home studio setup, this is what a general-purpose signal flow would look like (two examples):
- Mic/DI, → Interface (Input) → internal preamp → converter → Output to DAW (Recording channel)
- Mic → external preamp/converter (ADAT) → Interface digital input (ADAT) → Output to DAW


Now to the configuration of the interface to route the signals this way:
- Some devices allow you to route the mic/line/instrument inputs to any output that goes to the computer / DAW (recording channel). If so, just patch all ins and outs 1:1, meaning: mic input 1 goes to REC channel 1, mic input 2 goes to REC channel 2, etc. This is the easiest and most straightforward way.
- Other interfaces don’t allow you to configure that, in which case all channels will already be routed 1:1 and ending up in the DAW accordingly. You can simply move to the next step.
- Route the Playback channels that come from the DAW to appropriate physical outputs on the interface.
- Often you can either patch them directly to specific outputs or use a built-in mixer in the interface to make separate mixes for certain outputs.
- The latter allows you to quickly control what and how loud is being sent to these outputs (= to mix signals)
- Route the DAW playback channels 1 and 2 to the monitor outputs. These will be your main stereo outputs when listening back from the DAW or any other program. If possible, you can also route them to a headphone output as an alternative listening device.
- Route a second pair of playback channels (e.g. 3 and 4 or the last available two) to a separate headphone output. This will be the “foldback” or “cue mix” channels for one stereo headphone mix that the performer listens to while tracking.
- Route all other playback channels as you like. Most of the time you won’t need them and when you do you can use them as an additional signal path to route different signals or mixes from the DAW to different outputs.
- Often you can either patch them directly to specific outputs or use a built-in mixer in the interface to make separate mixes for certain outputs.
For device-specific information on how to set all of this, you will need to consult the manual of your interface.

6. Computer and DAW setup / optimization
6.1 Audio device / Playback engine
This is where you select your audio interface as the device to handle all audio input and output to/from the DAW. Depending on the specific software you use, this can be called slightly different.
6.2 Buffer size
This setting effectively changes how much time is reserved for processing the audio on the input and output (recording to and playing back from the drive). There are basically only two ways to set this:
- For all recording purposes: As low as possible without introducing clicks, pops or high CPU spikes. This way you get the minimum latency for monitoring in (almost) real time. See point 6.5 below for more details on how to optimize the performance here.
- For all other purposes (when low latency is not needed): As high as possible / 1024 samples. This is the safest setting and minimizes the chance of clicks/pops/dropouts while keeping CPU load peaks at a minimum.
6.3 I/O (Input/Output) routing
After the interface/preamp setup, the signals are already being sent from the interface to the computer / DAW. Now you just need to make sure they’re arriving on the right inputs that you can choose for audio tracks, aux channels, etc. You do this in the I/O setup, routing menu tab or something similar, depending on the DAW.
Generally you want a 1:1 routing again, so that all channels that come in from the interface (Recording / “To DAW” channels) align with the same channel numbers on all DAW inputs. An example: Analog input 1 from the interface is routed to the DAW Input 1 (via recording channel 1), Analog input 2 to DAW input 2 and so on.
6.4 Track/Bus/Aux routing
At this point, the signals should arrive at the inputs you can select on each audio track. Choose the right input for each track you want to record, enable input monitoring and/or arm the track for recording to check levels and if the right signals are there.
If that is all good, you need to set up the routing in the recording session / project itself in order to have control over everything. Apart from simple audio tracks, it’s a good idea to create busses / aux channels for the following purposes:
- Mix bus
- Also called the “2 bus”, this is the stereo sum of all the tracks of your production. This is what all tracks are being mixed to (hence the term “downmix” and “mixdown) – even when just listening. Logically this is also the track/channel that you route to the studio monitors – via playback channels 1 and 2 if you remember.
- Also called the “2 bus”, this is the stereo sum of all the tracks of your production. This is what all tracks are being mixed to (hence the term “downmix” and “mixdown) – even when just listening. Logically this is also the track/channel that you route to the studio monitors – via playback channels 1 and 2 if you remember.
- Cue mix / foldback
- This is a separate mix you create for the person performing during tracking (using pre-fader aux sends). Create a bus, name it “cue” or similar and set it as the input for the cue aux channel. The output of this channel should go to the playback channels you have set in your interface to go to the artist’s headphone output.
- This is a separate mix you create for the person performing during tracking (using pre-fader aux sends). Create a bus, name it “cue” or similar and set it as the input for the cue aux channel. The output of this channel should go to the playback channels you have set in your interface to go to the artist’s headphone output.
- Line out master busses (optional)
- If you use additional outputs for other purposes than the above, it still makes sense to route the signals that go to them through their own aux channels / master busses.
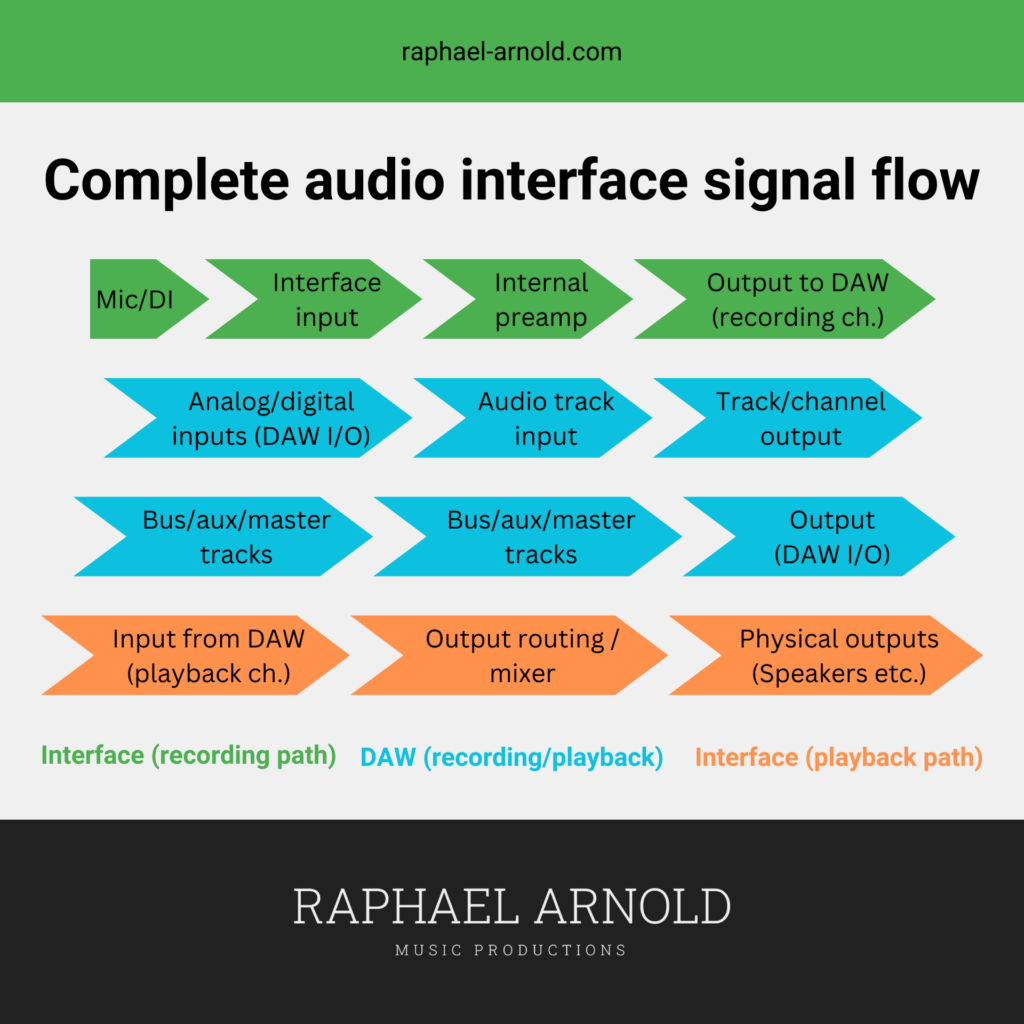
Everything’s done! If everything went right, you’re all set for the first recording session with this setup. As a final overview, this is what the complete studio signal flow looks like:
Mic/DI source → Interface input → internal preamp → Interface output to DAW (Recording channel) → Analog/Digital Inputs (DAW I/O) → Audio track input → Track output → Busses / Aux/Master tracks → Output (DAW I/O) → Interface Input from DAW (Playback channel, “Computer play” or similar) → Output Routing / Interface Mixer → Physical output (Speakers / Headphones / Line outputs)
Interface (recording path) | DAW (recording/playback) | Interface (playback path)

6.5 Computer optimization
Connected devices cause regular or irregular “interrupts” which temporarily block the CPU to communicate with it. This means the CPU cannot process audio to “fill” the audio buffers in that moment. The smaller the buffer size (required for recording with low latency), and the more devices that interrupt the CPU, the more likely it is that the buffer cannot be “filled” all the time – which results in clicks/pops or even audible dropouts.
- Connect as few devices to the computer as possible (only the ones you need during the production.
- Deactivate unnecessary background tasks/apps.
- Deactivate unnecessary system features, services etc.
- Deactivate system sounds (they can be distracting and annoying and potentially ruin an otherwise perfect take).
- Deactivate all power saving features and enable maximum performance mode.
Are you interested in my studio services? Click the button below to get to the home page for details, my portfolio, and bio.

